Gmail is widely used web service across the world for many different requirements like accessing many Google’s services. And as we all know 21st century is the peak of Internet so it is common to have more than a single Gmail address by a single user.
Sometimes its is bit lazy or can say annoying to check all our emails accounts one by one, but what if you can combine all your emails account to a single one.
Today in this article, I am going to show a step-by-step process to combine all your email addresses to a single Gmail Inbox.
Google’s top most priority product, Gmail which considered to be one of the most efficient and promising web mail services. It is also known as one of the first web mail service available to its users on Feb 2007. Inaugurated as the beta-only version on 1 April 2004.
It considered as most secured and freeware webmail system, having many great features in it. It also works as an email client with which you can combine all your email addresses to a single Gmail account.
You will get all your emails from other accounts to your desired Gmail account inbox to read and send emails using any email address.
There is no limitation regarding email addresses out of the Gmail, means you can add any email addresses from any webmail system.
Also Read:
- How To Create Custom Email Address For Your Domain Using Gmail
- How to Set a Default Google Account For Multiple Gmail Accounweb mail
This article will be focused on three processes regarding this topic:
- Email forwarding
- Gmail’s Mail Fetcher
- Send As Option
# Email Forwarding: ( Process 1 )
This Email Forwarding step is to make ensure that all your emails from your old account should reach your desired primary Gmail account instantly.
This feature will be found in your Gmail account setting. If this step won’t work for you or if your email account doesn’t support email forwarding feature.
You can directly skip to the next step which is “Gmail’s Mail Fetcher“.
Every email system may have its own different setting to setup this Email Forwarding.
In this, I am using Email Forwarding with my other email account which is also a Gmail account.
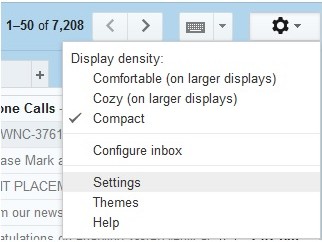
Login to your Gmail account from which you have to set “Forward to” primary account. In your Gmail account you will see a gear icon on the top right side of your screen just under your avatar icon.
Under setting section you will see many tabs, click on the “Forwarding and POP/IMAP“ and then click “add a forwarding address“. You will be asked to enter email address where you want to forward you mails.
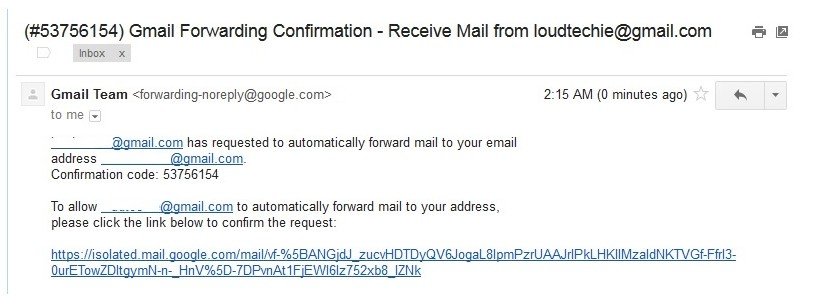
Now Gmail team will send a confirmation mail to your primary mail account. Log into your primary Gmail account and confirm the email by clicking on the confirmation link from Gmail.
Now your forwarding mails is setup and you are ready to forward all your mails to primary account. Go to Forwarding under Forwarding and POP/IMAP tab and enable it to send mails.
Remember to Save changes at last.
# Gmail’s Mail Fetcher: ( Process 2 )
If you are facing problem while doing Email Forwarding or if forwarding feature is not available in your email account.
You can also go for this other alternative for email forwarding. Mail fetcher is another feature to fetch all your emails from one account to another account.
It is also quite an impressive and just as simple as Mail Forwarding. For this, first you just have to make sure that your account supports the standard POP3 protocol.
There are two types of Mail Protocols POP3 and SMTP.
Our SMTP is stands for Simple Mail Transfer Protocol (SMTP) and the other we are going to use here is POP3 which is Post Office Protocol (POP). If yes, then follow the steps below:
– Again go to your account setting window.
– Then select Accounts and Import > Add a POP3 mail account you own.
– A pop-up box will appear asking you to enter the email account to which you want to send all your fetched mails. You are allowed to add 5 different emails accounts for this Email Fetching.
– After this provide your full email address in Username filed.
– Enter the password that you specified when you set up your email account. Confirm that your correct POP server information and port number of 995 is specified.
– After Add Account. The next page prompts you to specify whether you would like to send messages from your newly added account. Proceed Finish by selecting yes.
So this above explained series of steps is the complete process of setting up Gmail’s Mail Fetcher feature.
Hope you find it helpful.
Also Read:
- How To Track Gmail Messages with Google Analytic
- Get Gmail Desktop Notifications in Chrome and Mozilla Firefox
# Send As Option: ( Process 3 )
In Process 1 & 2 I explained 2 different methods how to combine all email accounts into a single one.
That enable us to get all emails into our primary account, but we still half way away from the perfection. And that is how to send email using another address from your Gmail account.
So just follow up 6 simple steps to complete this process:
1- Now login to your Gmail account. Click again on gear icon on the right side and select “Setting“.
2- Now click on “Accounts and Import“. And click on “Add another email address you own“.
3- A new pop-up window will appear, enter your name in the username and your email address you want to add. Press “Next Step“
4- In the next step, you will be asked to confirm the ownership of your email address you just entered, by getting a verification code into your Gmail address.
5- Next login to your Email account, for which you just requested a verification code. Retrieve the code and fill it inside the “verification code box” and press Verify.
6- Now its done! From now on every time you compose a new mail, a “From” field will be shown in which you can select your added email addresses.
These three steps could be a useful thing to do with your Email accounts. I hope you’ll find it easy to follow. Enjoy!!
If you find it interesting to read don’t forget to share it on your social media networks with your friends.


